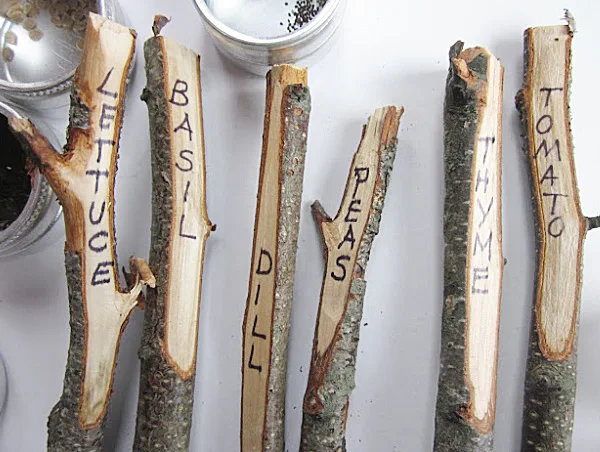
Make Your Own Garden Plant Stakes
I'm not a big gardener but a few herbs started from seed puts me in the Spring-time mood.
In my yard were hundreds of broken branches from the very long winter.

After reading a past issue of Martha Stewart Living Magazine, I finally had a good use for these sticks.
I started out by breaking off a handful of sticks, all about the same length.

I gathered the tools needed for this project.

A pruner and a potato peeler.

Note: Your may need a new potato peeler after this!

Using permanent marker, I wrote the names of the plant on each stick.
A spritz of spray Poly will keep the letters from fading in the sun.
Stick the stakes in the soil and you're ready to grow!

Ready for some Spring-time herb planting!

Please pin for later! >>

Perfect for new seeds or to just organize your garden!
I hope you enjoyed this project and you'll take a look at my Amazon Shop for craft supplies I recommend. Also while you're here please sign up for the Homeroad emails so I can send my latest DIY post straight to you.
Way too cool! I love them and so economical and "green"...thanx for sharing...my gal pals and I will have to try this during craft nite out! Visit me at my blog sometimes. Tiff
ReplyDeleteThis is really great, I am ready to get some things in the ground. Thanks for sharing a wonderful idea.
ReplyDeletePenny
Awesome! I've got sticks everywhere, now I've got a project to do with my Grandkids! Fun!
ReplyDeleteI love this idea! Do you know how many random sticks are hanging out around me house? Perfect for all the weather that my garden gets during the season. Thanks so much for the inspiration! Have a wonderful weekend! Please stop by sometime and say hello! Love meeting new crafty people~!
ReplyDeleteA lovely simple functional idea. SO perfect for a garden!
ReplyDeletelove these! What does this do to a potato peeler? Is it ruined afterward?
ReplyDeleteThat is such a brilliant idea! Attractive, super simple, eco friendly, etc etc! Wow! :D
ReplyDeleteSuch a great idea, Susan! I used forks a few years back but that proved problematic when my toddler would pull them out and then I'd hit them with the lawnmower. Sticks I wouldn't feel so bad about running over! :) I imagine a pocket knife could be used instead of the veggie peeler. Your blog is always full of great ideas--I really enjoy visiting!
ReplyDeleteTake care,
Erin
What a great idea. This is what I will be doing this year! Thanks for the tip.
ReplyDeleteI love the idea of keeping the garden "natural" and your sticks are a great! Thanks for the inspiration!
ReplyDeleteWhat a cute idea. I love the look of that too.
ReplyDeleteThanks for linking it up to my Organizing Mission Monday link party.
Fabulous idea!!!! I saw those spoons engraved with the herb name, but this is sooo much easier and nicer! good job!
ReplyDeleteWhat a great idea! Thanks for sharing.
ReplyDeleteGenius!!! Great job! Looks good too!
ReplyDeleteLove it - I am your newest follower!! Hey, what about that avocado? Have you grown them before??
ReplyDeleteThese are really cute!
ReplyDeletehiya , i love this simple yet so useful project
ReplyDeletexmaggiex
I saved this idea! A fun project to do with my kids for our garden this year! Thanks so much for linking up to Terrific Under Ten today!
ReplyDeleteLoved this idea Susan. I used a fallen tree branch as a curtain rod this week and love it. It was green and cheap. :)
ReplyDeleteCute idea. I must have missed that in the magazine. And I sure have enough sticks laying around the yard that I can make this project!
ReplyDeleteGreat idea. I'm ready for Spring to really show up now. It's snowing here this morning...what's that about? Thanks so much for sharing at my Swing into Spring party.
ReplyDeleteVery cute idea, I love it!
ReplyDeletewhat a great idea!!!!
ReplyDeleteMaybe I should be thinking about starting some herbs. This is my first spring with my own garden and I can't wait to have fresh herbs!!! This project goes on my list of future projects.
ReplyDeletegreat idea! i was just thinking about how i could make some of these without spending any money.
ReplyDeletethanks so much for sharing
Love this idea!! found you via All Things Heart & Home! ~*S*~
ReplyDeletelove this idea too! this is great. very crafty.
ReplyDeleteGreat idea! Love them! Thanks for linking it up!
ReplyDeleteThank you for linking up to my K.I.S.S. blog bash last week. This weeks blog bash is in full swing again, please be sure & link up more of your creativity. Happy to let you know that your seed stakes are a featured project today on my blog!
ReplyDeleteDrop by The Tattered Tag
I just found your feature on The Tattered Tag and I just had to see it for myself.
ReplyDeleteYou have made something so simple and easy, yet who would ever think of that?
Very creative.
BTW - I love the pics on the top of your blog!!!
I've put together a round up of great garden projects on Craft Gossip today and included your post. :) You can see it here
ReplyDeletehttp://homeandgarden.craftgossip.com/6-fresh-garden-ideas-for-spring/
If you would like to share the Craft Gossip love and show your visitors you've been featured, you can grab a button here!
http://homeandgarden.craftgossip.com/grab-a-craft-gossip-button/
That is awesome!
ReplyDeleteI love this idea! I found you on Homeandgarden.craftgossip.com I would love for you to share this and any other ideas you have on DIY Thrifty Thursday at www.thrifty101.blogspot.com
ReplyDeleteWow, this looks lovely. Hope to see you at My Dream Canvas.
ReplyDeleteSusan, just stopping by to tell you that I made your awesome garden stakes. Just posted some pics of my veg garden with them this morning. Hope you can stop by!! :)
ReplyDeletehttp://lisatakesix.blogspot.ca/2012/05/how-does-your-garden-grow.html
Great idea! thanks!
ReplyDelete